The grading tool
-
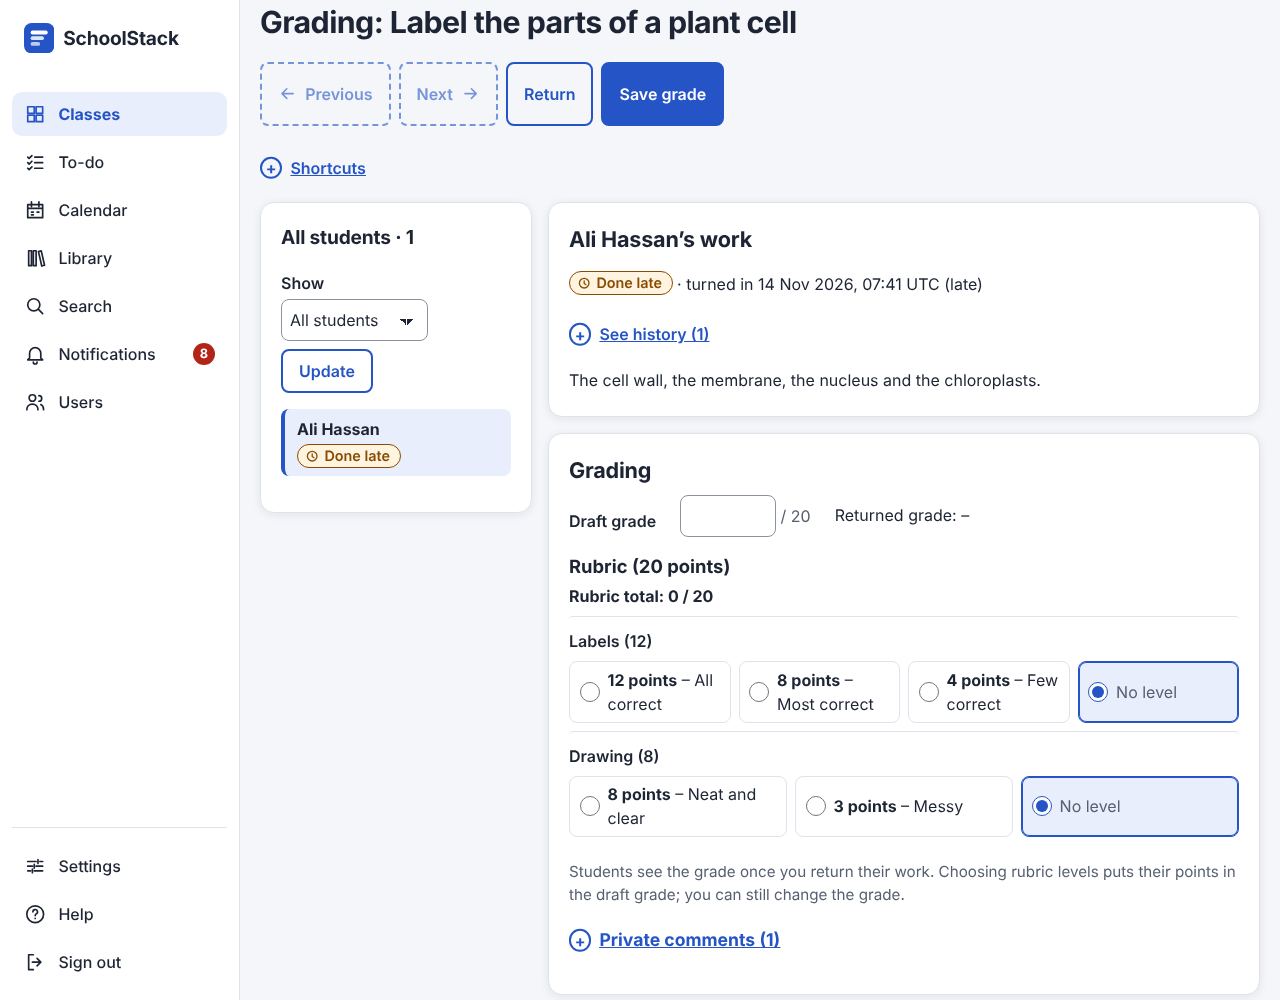
Open the work and choose Open the grading tool under Student work (or Open next to a student).
-
Choose a student in the list of students (on a phone, the Student menu) and read their work: their answer, files with previews, links, quiz answers and replies.
-
Type the Draft grade. If the work has a Rubric, choose a level in each row of its grid.
-
If you like, write a Private comment and choose Post.
-
Choose Return to give this student their work back (it saves the grade and rubric too), or Save grade to save them without returning.
-
Choose Next for the next student, and so on.
Good to know
- On a computer the page has two columns: the list of students, each with the status of their work (Turned in, Done late, Missing…), on the left (right in Arabic), and the chosen student's work and grading beside it. On a phone everything is one column.
- Previous, Next, Return and Save grade stay at the top, always in view.
- Show (then Update) keeps the list, Previous and Next to Turned in, Not turned in,
Graded or Returned work (or All students). On a phone, Student and Open jump
to anyone, and the page says where you are ("Student 2 of 5"). (Query for agents:
work.gradingTool.) - Grading shows the Draft grade and the Returned grade (what they see now).
- The rubric grid has a row for each criterion with its levels side by side (and No level).
With scoring, Rubric total adds up the levels you saved, and choosing levels puts their points
in the draft grade when you save (you can still type another grade). (Command:
rubric.grade.) - 💬 New comment next to a student (in the list, the Student menu and on Student work) means they wrote a private comment no teacher of the class has opened yet.
- Opening that student here opens their comments, and the mark goes away for every teacher of the
class; posting an answer clears it too. (Command:
submission.seeComments.) - All done. When every turned-in work is returned, a green bar at the top says All done: every turned-in work is returned (and how many haven't turned it in yet), with Back to the assignment and Next in To review (the next work with students waiting).
- The tool never closes or leaves by itself.
- See history (under the student's status) lists what happened to their work, newest first, with the time and who did it: turned in (and late), unsubmitted, each draft grade, and returned with or without a grade.
- Only teachers see the history. Work from before 17 October 2026 shows only its last turn-in and return.
- Reopen for this student (work that closes at its due date): choose Open until and
Reopen; this student can turn it in or change it until then (it counts as late), and it
shows in See history. (Command:
submission.reopen.)
Mark up a picture or PDF
- Under a picture or PDF the student turned in, choose Mark up. It opens to write on, like a red pen on paper: with your finger or a stylus on a phone or tablet, with the mouse on a computer.
- Choose a tool: Pen, Highlighter, Text note (tap where the note goes, write it, then Add note) or Eraser (tap a line or a note to remove it); a colour; Undo. Scroll (chosen first) moves the page without drawing.
- Choose Save marks. (Command:
markup.save.)
- Your marks are kept as a layer over the file, which never changes. Notes are numbered on the page and listed under it.
- For a PDF, the arrows go to the other pages; Pages with marks lists the ones you marked.
- Add a note works from the keyboard (and without the drawing tools): choose Where on the
page (top left, middle, bottom right…), write the Note and choose Add note. Remove
next to a note takes it away. (Commands:
markup.addNote,markup.removeNote.) - Clear all marks on this page starts again.
- The student sees your marks when you Return the work (as with the grade): the lines over their file, and your notes written out under it. Marks you change later reach them when you return the work again.
- The grading tool says marked pages: 2 next to a file you marked.
Keyboard shortcuts (on a computer, under the title):
- J or Alt + → the next student, K or Alt + ← the previous one, G the grade box, C the private comment box, R the rubric, S saves the grade, ? opens the list.
- While you type in the grade box, Ctrl + Enter saves the grade; in the comment box it posts the comment. The keys never work while you type in a box, and they are the same keys on an Arabic keyboard.
- To use Alt + letter instead, or to turn them off, see Keyboard shortcuts.
Comment bank: comments you write often, kept with your account for every class.
- Tick Also add it to my comment bank when you post a private comment, or type comments under
Add to bank (tick One comment per line to add several at once). (Command:
bank.add.) - Use puts a comment in the private comment box, to change it if you like and Post. The
ones you use most are listed first. (Command:
submission.commentwithbank;bank.listlists them for agents.) - Edit a comment to change it (Save) or Delete it. (Commands:
bank.edit,bank.delete.)
Example: Sara explains a tricky diagram better aloud. In the grading tool she records a 2-minute video on her phone (Recording ▸ Take Video), types "Your labels are right; redraw the arrows from the sun to the leaf" and chooses Post. Huda watches it on her phone; Omar, who is deaf, reads the text under it.
Example: Omar says he turned in his essay on time. Sara opens See history: "Turned in · Omar", then "Unsubmitted · Omar" and "Turned in (late) · Omar" the next day, so the late mark is right.
Example: Sara opens the grading tool with Show: Turned in: the list shows the five students who turned in. For Ali she types 18, posts "Great labels!" with Also add it to my comment bank ticked and chooses Return. Next takes her to Huda, where she chooses Use next to "Great labels!", adds "Check your spelling too." and posts it.
Related: Rubrics · The Grades page · To review · Keyboard shortcuts